Using the App
The showwhat configurator is a standalone web app that runs entirely in your browser. There is no server -- your work is saved automatically to localStorage and can be exported as YAML or JSON at any time.
Overview
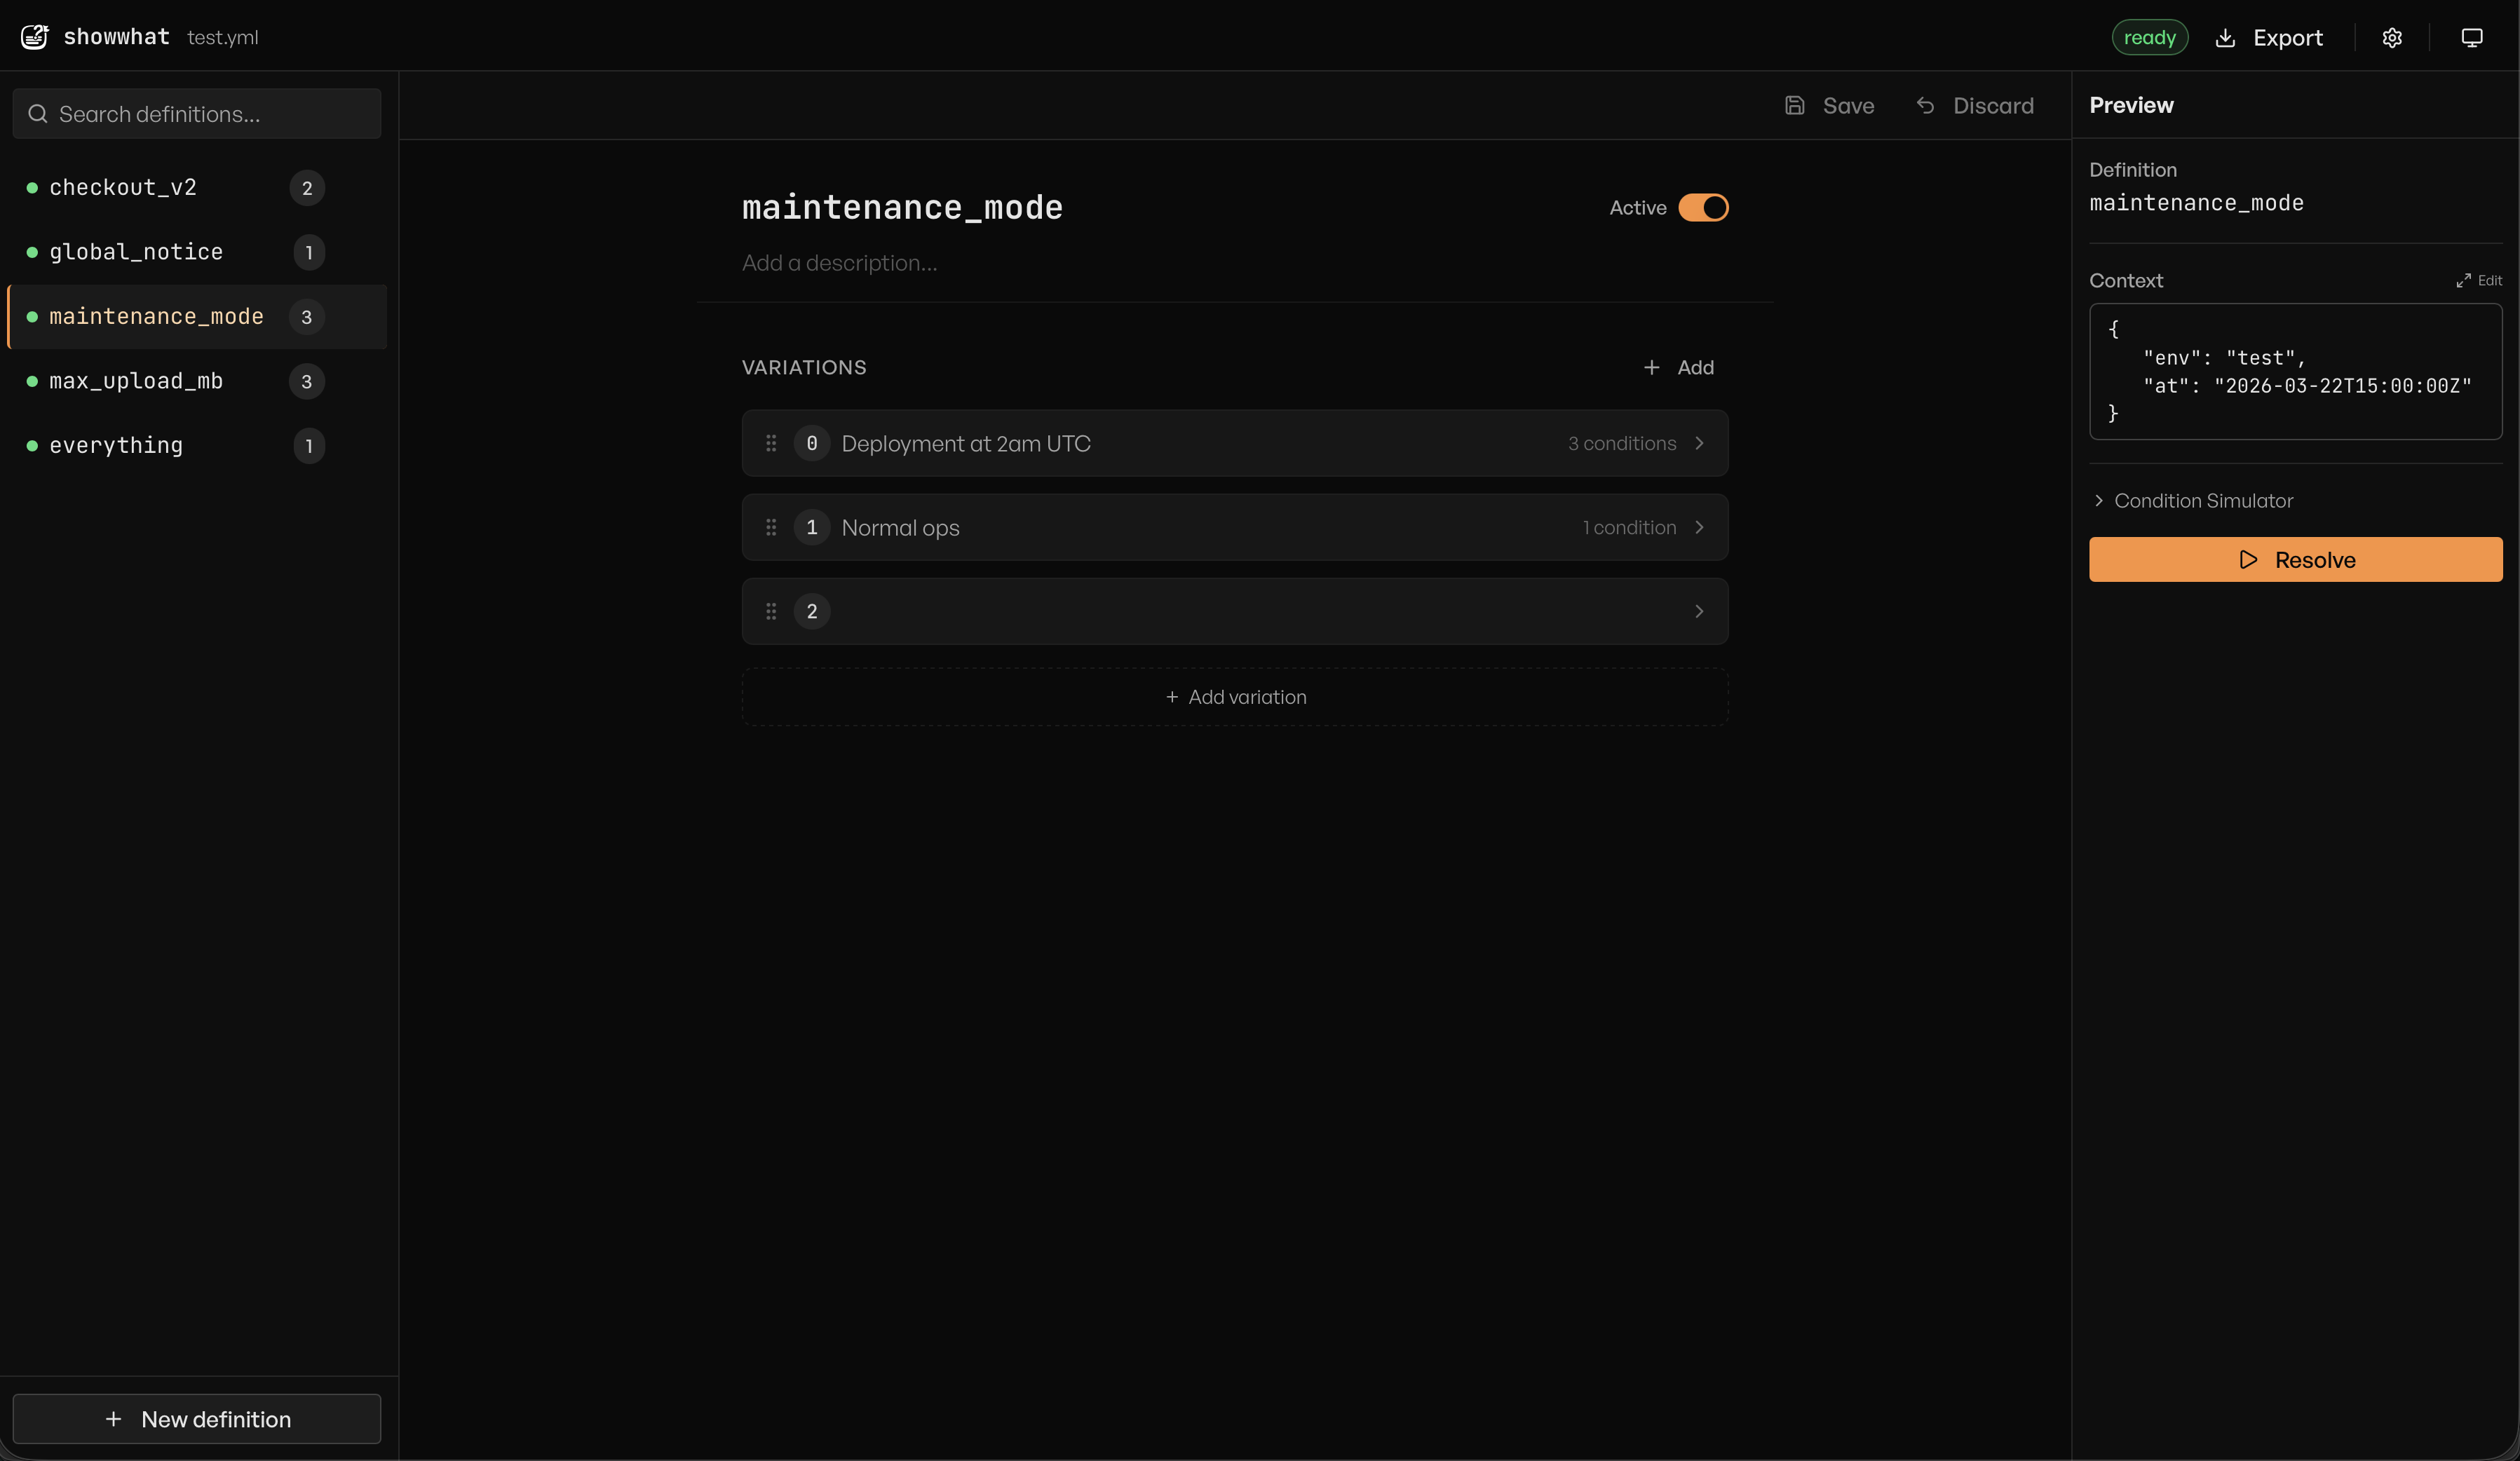
The app is organized into three panels. The sidebar on the left lists all your definitions and lets you search, add, and delete them. The editor in the center is where you configure the selected definition -- its name, description, active state, and variations. The preview panel on the right lets you test a definition against sample context to see which variation would match at runtime.
Above everything sits the toolbar. From left to right it shows: the showwhat logo, the source file name (if you imported a file), a status badge, the Export button, a Settings button, and a theme toggle that cycles between light, dark, and system modes.
Creating a definition
When you open the app for the first time, you see an empty state with two options: Create new (start from scratch) and Import existing (load a YAML or JSON file). Pick whichever fits your situation.
To create a definition later, click the New definition button at the bottom of the sidebar. A text field appears -- type a key for your definition (for example, dark-mode or pricing-tier) and press Enter. The new definition opens in the editor with no variations yet.
At the top of the editor you will see the definition key displayed as a large heading. Click it to rename it inline. Below the key is a description field -- an optional one-liner that helps your team understand what this flag controls.
Enabling and disabling
Every definition has an Active toggle in the top-right corner of the editor. When a definition is inactive, the rule engine skips it entirely during resolution and throws a DefinitionInactiveError. This is useful when you want to temporarily disable a flag without deleting it or its configuration.
Adding variations
A variation is a possible value your flag can return. Each definition can have multiple variations, and the rule engine evaluates them in order, returning the first one whose conditions match.
To add a variation, click the Add button next to the "Variations" heading. A new collapsed card appears. Click it to expand and reveal the editing fields:
- Value -- the value returned when this variation matches. Supports strings, numbers, booleans, and JSON.
- Description -- an optional label so you can tell variations apart at a glance.
- Conditions -- the rules that determine whether this variation matches (covered below).
A variation with no conditions is called a catch-all -- it always matches. Place it last in the list to serve as a default fallback. If a catch-all appears before other variations, those below it will never be reached.
Reordering variations
Order matters. The rule engine evaluates variations top to bottom and returns the first match. To reorder, grab the drag handle (the grip icon on the left edge of each variation card) and drag the card up or down to its new position.
Building conditions
Conditions define when a variation should match. To add one, expand a variation card and click Add condition inside the Conditions section. A dropdown menu appears with the available condition types:
- String -- compare a context field against a string value.
- Number -- compare a context field against a numeric value.
- Datetime -- compare a context field against a date and time.
- Boolean -- check whether a context field is true or false.
- Environment -- match against an environment name (a shorthand for a string comparison on a well-known key).
- Start At / End At -- time-window conditions that activate or deactivate a variation based on the current time.
- Custom -- a freeform condition type for app-specific logic that your own evaluator handles.
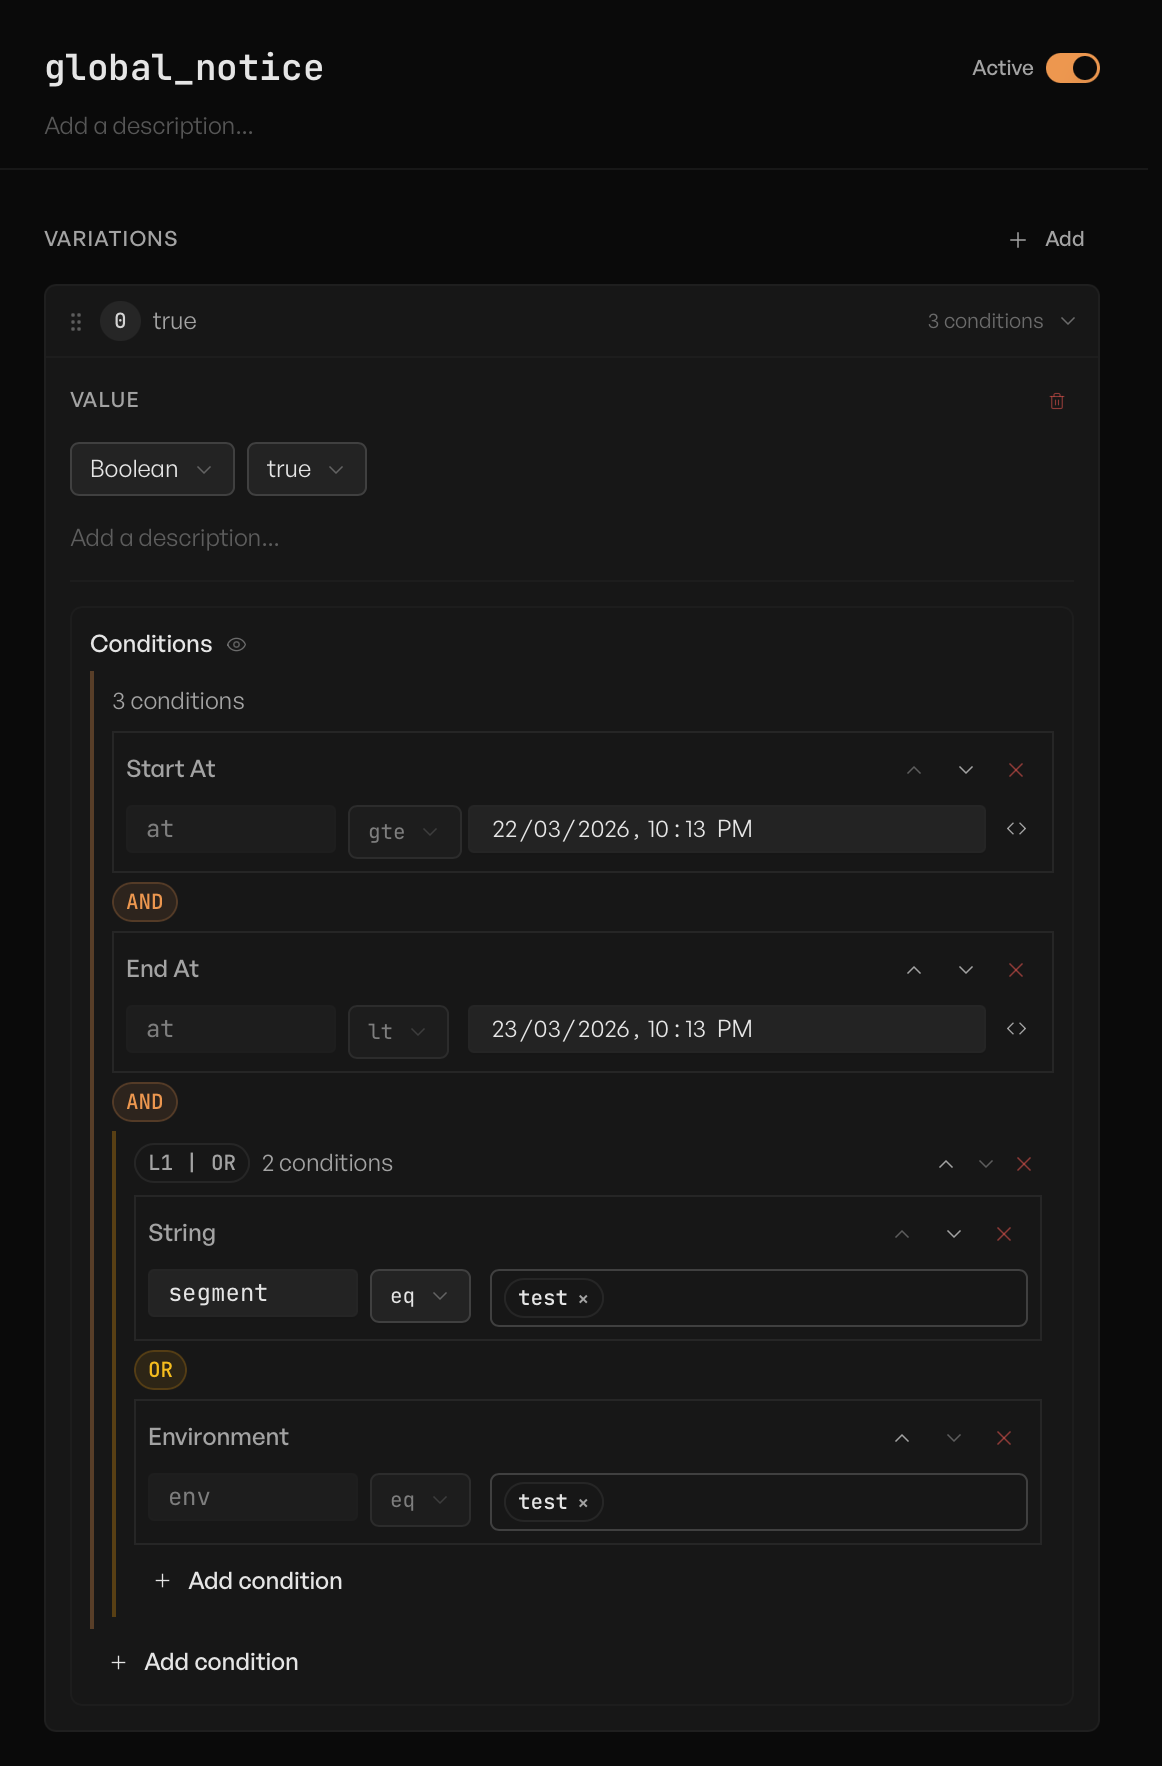
All conditions on a single variation are combined with AND logic -- every condition must pass for the variation to match.
AND / OR groups
For more complex rules, the dropdown also offers AND Group and OR Group. These let you nest conditions inside a logical group:
- An AND group requires all of its inner conditions to pass.
- An OR group requires at least one of its inner conditions to pass.
Groups can be nested further, so you can build expressions like "environment is production AND (region is us-east-1 OR region is eu-west-1)". Between each condition in a group, a badge indicates the logic -- AND or OR -- so the evaluation order is always visible.
Testing with the preview panel
The preview panel on the right side of the screen lets you test the currently selected definition without leaving the configurator. It has two inputs and a Resolve button.
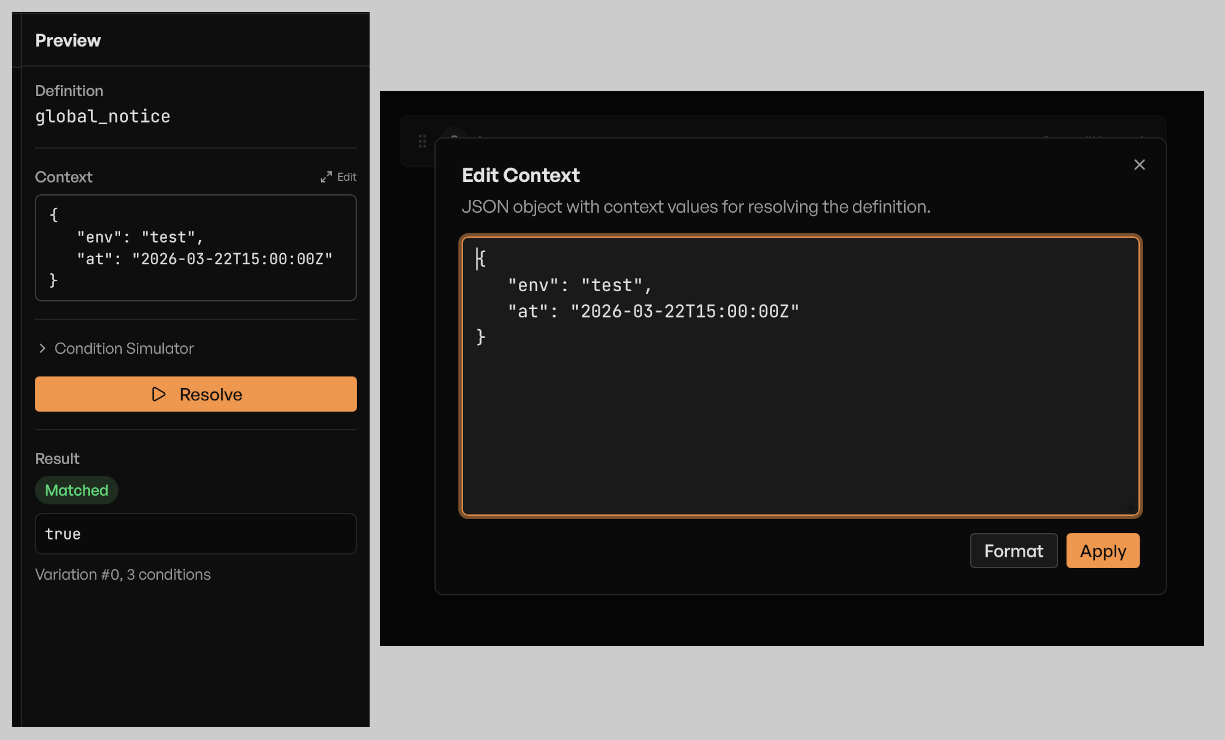
Context
The Context textarea accepts a JSON object representing the runtime values your application would provide. For example:
{ "env": "production", "region": "us-east-1" }After entering your context, click Resolve. The panel runs the rule engine against the selected definition and shows the result: which variation matched (or why none did), the returned value, the variation index, and the number of conditions evaluated. If the definition is inactive, you will see an "Inactive" badge. If no variation matched, you will see "No Match".
Condition simulator
Below the context input is a collapsible Condition Simulator section. This is for condition types the built-in engine does not know how to evaluate -- custom or unregistered types that would normally require your application's own evaluator.
Expand the simulator and enter overrides as one type:true or type:false per line. For example:
tier:true
geo:false
When you click Resolve, any condition whose type appears in the simulator will use your override value instead of failing. This lets you test complex flag configurations without wiring up a real evaluator.
Importing and exporting
You can import a definitions file in two ways: through the Import existing card on the empty state, or by clicking the hidden file input triggered from the toolbar (the same mechanism used on first launch). The app accepts .yaml, .yml, and .json files.
To export, click the Export button in the toolbar and choose Export as YAML or Export as JSON. The exported file contains all saved definitions. If you imported a file, the export filename is based on the original.
Export is disabled when you have unsaved changes or validation errors. Save or discard your changes first, then export.
Managing definitions
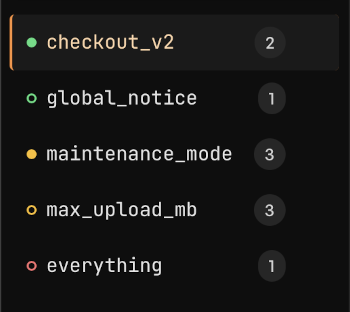
Each item in the sidebar shows the definition key, a variation count badge, and a status dot. The dot color tells you the state at a glance:
- Green (filled) -- active and saved.
- Green (hollow) -- active with unsaved changes.
- Yellow (filled) -- inactive and saved.
- Yellow (hollow) -- inactive with unsaved changes.
- Red -- has validation errors.
To delete a definition, hover over it in the sidebar and click the trash icon that appears. A confirmation dialog will ask you to confirm before deleting.
Inside the editor, the action bar at the top provides Save and Discard buttons for the selected definition. Save persists your changes to localStorage. Discard reverts to the last saved state (with a confirmation dialog to prevent accidents).
The status badge in the toolbar reflects the global state across all definitions. It shows "ready" (green) when everything is saved, "unsaved changes" (amber) when any definition has pending edits, or "errors" (red) when validation issues exist. When unsaved changes are present, clicking the badge opens a confirmation dialog to revert all changes at once.
If you try to close or navigate away from the browser tab while unsaved changes exist, the browser will warn you before discarding your work.